How to Add and Optimize a Power BI Slicer Search
Power BI slicer search is a great trick for navigating large datasets with ease. Whether you’re filtering a vast product catalog or drilling down on customer information, this feature enhances user experience by making data discovery intuitive. In this guide, we’ll walk you through everything you need to know about enabling and optimizing slicer search in Power BI.
What Is a Power BI Slicer Search and Why You Need It
A slicer in Power BI acts as an interactive filter that lets users refine data displayed in reports. Adding a search bar to a slicer elevates its functionality, allowing users to quickly locate specific items without scrolling through long lists. This feature is particularly useful for:
- Large Datasets: Quickly filtering thousands of entries in product or customer lists.
- Enhanced Efficiency: Saving time and improving the accuracy of data exploration.
- User-Friendly Reports: Making your reports accessible to non-technical stakeholders.
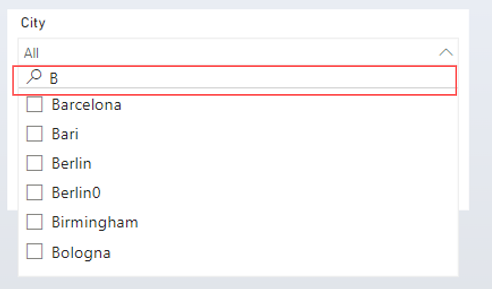
For example, imagine managing a retail dataset with thousands of Cities. Instead of scrolling endlessly, a search-enabled slicer allows users to type in the City and instantly find relevant data. Power BI slicer with search makes this process even more efficient by enabling faster filtering and data discovery.

Step-by-Step Guide to Adding a Search Bar to Power BI Slicers
Method 1: Enable Search Through the Ellipsis Menu
- Select the slicer in your Power BI report.
- Click the ellipsis (
...) on the top-right corner of the slicer. - Choose “Search” from the dropdown menu.
- The search bar will now appear at the top of the slicer.
Pro Tip: This feature is supported only for text fields. Numeric fields will not display the search option.
Method 2: Using Keyboard Shortcuts (Ctrl + F)
- Highlight the slicer by clicking on it.
- Press
Ctrl + Fon your keyboard. - A search bar will instantly appear, ready for input.
This functionality simplifies these processes, making it a vital feature for users working with extensive datasets.
If the search bar doesn’t appear, check the filters data field type and ensure your Power BI version is up to date.extensive datasets; just input your search query, and watch as the slicer promptly filters the results in real-time.

If you rather like to see the video, head over to my LinkedIn post. In 10 seconds, you can learn how to apply this searching technique!
Common Issues and How to Troubleshoot Them
1. The Search Option Is Missing
- Ensure your slicer uses a text field; numeric fields are unsupported.
- Verify that your Power BI version includes the search bar feature (update if necessary).
2. Slow Performance with Large Datasets
- Limit the slicer’s data source to essential fields to enhance performance.
- Use indexing or optimized queries in your data model to reduce load times.
The search function is a powerful tool that, when configured correctly, address these challenges effectively.
Enhancing Power BI Slicers with Search
Best Practices for Using Slicers Effectively
- Organize Fields: Group similar fields together to make slicers intuitive.
- Set Default Filters: Pre-set slicer values to guide users to the most relevant data.
- Minimize Clutter: Limit the number of slicers on a report page to avoid overwhelming users.
Advanced Customization Options
- Use the “Text Filter” visual from Microsoft AppSource for a customizable search box.
- Apply slicer formatting options to align with your report’s theme and branding.
Power BI slicer with lookup function enhances these practices by adding precision and efficiency to filtering tasks.
Frequently Asked Questions
FAQ
What is the Power BI slicer search?
The Power BI slicer search is a feature that allows users to filter large lists in slicers using a search bar. Power BI slicer with search adds extra convenience to this functionality.
Why can’t I see the search option in my slicer?
Ensure your slicer is using a text field, as numeric fields are not supported for the search feature. Power BI slicer with search works seamlessly with text fields.
How can I enable the Power BI slicer search?
There are two methods to enable the slicer search:
-
Through the Ellipsis Menu:
- Select the slicer in your Power BI report.
- Click the ellipsis (
...) on the top-right corner of the slicer. - Choose “Search” from the dropdown menu.
- The search bar will appear at the top of the slicer.
-
Using Keyboard Shortcuts:
- Highlight the slicer by clicking on it.
- Press
Ctrl + Fon your keyboard. - The search bar will instantly appear, ready for input.
Can I customize the slicer search bar appearance?
While built-in slicers have limited customization, you can use third-party visuals like “Text Filter” for advanced styling. Power BI slicer with search also benefits from such visual enhancements.
Conclusion
Enabling a filter search in Power BI is an effective way to enhance report usability and accessibility. By following the steps outlined above, you can quickly set up and optimize this feature for your reports. Troubleshooting tips and customization options ensure you’re equipped to handle any challenges.
Power BI slicer search and Power BI slicer with search are indispensable tools for creating efficient, user-friendly reports.
Looking for more tips on filtering Power BI visuals? Check out my blog post: How to filter one visual by another?

