Table of contents
Introduction: Power BI Alerts
As a Power BI developer, I often get requests from clients who want custom notifications or alerts in Power BI. They don’t just want static threshold triggers — they need smarter, dynamic solutions that respond when KPIs actually change. That’s where Power BI alerts and Power BI notifications come in. These features provide an effective way to monitor data in real time, track important metrics, and react quickly when something shifts.
Still, many users run into limitations. For example, data alerts in Power BI work well for simple thresholds, but they don’t always cover more advanced scenarios. That’s why Microsoft has introduced new capabilities such as Power BI Activator alerts, part of the Data Activator feature in Microsoft Fabric. This makes it possible to set up intelligent, dynamic alerts directly in your workspace without complicated workarounds.
This guide explains how to configure Power BI data alerts, even without a Pro license, and dives into Power BI data-driven alerts documentation and best practices. Whether you’re setting up basic rules or exploring Power BI alerts and notifications with Data Activator, you’ll find practical steps here.
- Using Dashboard Alerts for straightforward notifications.
- Combining Power Automate with Power BI for customized workflows.
- Leveraging Data Activator (Power BI Activator alerts), a Microsoft Fabric feature, for dynamic alerts and advanced functionality.
Option 1: Pin Visuals and Use Dashboard Alerts
Overview
The most straightforward way to configure Power BI alerts is by using dashboard alerts. This approach involves pinning a supported visual—such as a gauge, KPI, or card—to a dashboard and setting up the Power BI alert rules with static thresholds. It works well for users who only need alerts in Power BI without advanced integrations or complex licensing.
By setting up these data alerts in Power BI, you can keep track of critical metrics and get Power BI notifications whenever a defined condition, such as “greater than” or “less than,” is triggered. It’s a simple, reliable method, but it’s important to understand its limitations and prerequisites before relying on it for business-critical scenarios.
Not sure what the difference of a dashboard and a report in Power BI is? Don’t worry, check out my dedicated blog post: Power BI Dashboard vs Report
Don’t Miss Out!
50% OFF DataCamp SQL – Secure Discount now!
Learn SQL Skills, Level Up Your Career
For selected periods only!
Click Here & Start Now!1. Prerequisites
- Power BI Free License: You can create alerts in My Workspace, the personal workspace available to all Power BI users. Alerts can also be configured on dashboards shared within a Premium capacity workspace, even without a Pro license.
- Power BI Pro License: Required for creating alerts on dashboards in shared or non-Premium capacity workspaces.
2. Steps to Configure Power BI Alerts
1. Pin a Visual to the Dashboard
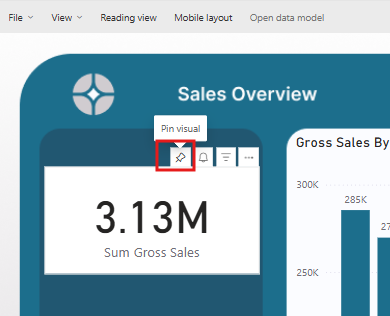
Before setting up alerts, ensure the visual you want to monitor is pinned to a dashboard. Open your Power BI report, locate the desired visual (e.g., KPI, card, or gauge), and click the Pin icon at the top-right corner. Choose the dashboard where you want the visual to appear.
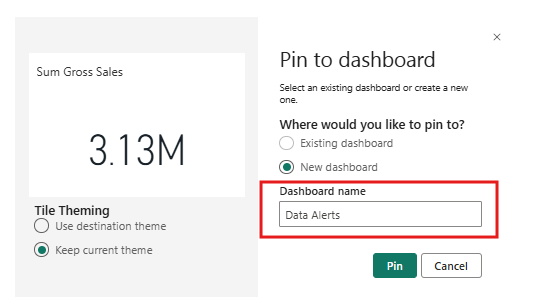
Once you pinned the visual, choose if you want to pin it to a new or existing dashboard. I named mine “Data Alerts” and created a new one:
2. Open the Dashboard
Navigate to the dashboard where your visual is pinned. Dashboards are accessible from the Power BI workspace and provide a consolidated view of your data.
In your workspace, you will now find the dashboard icon. Open it to review the alert:

3. Locate a Supported Visual
Identify the tile containing a supported visual on the dashboard. Power BI alerts work with specific visuals, including KPIs, gauges, and cards.
4. Access the Alert Settings
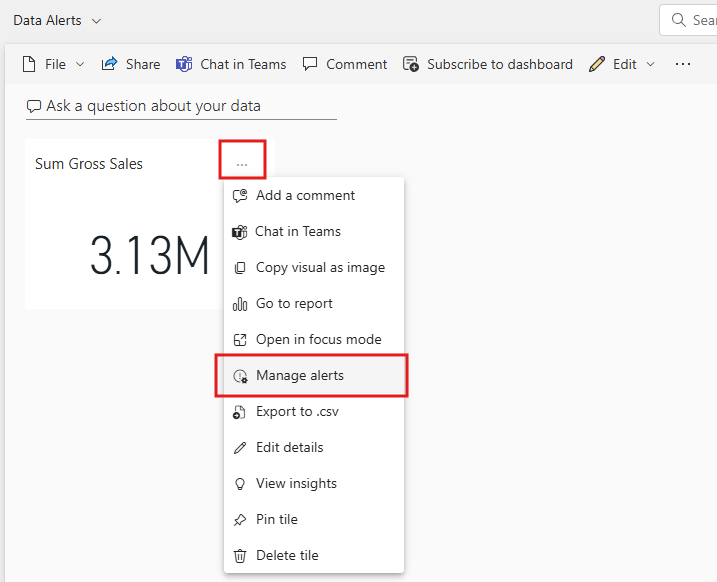
Click the ellipsis (…) on the tile to open a dropdown menu. Select Manage Alerts to access the settings where you can define notification rules.
🚀 Level Up Your Career with Power BI & DataCamp!
Learn Power BI, SQL & Data Skills Trusted by Top Companies.
What are you waiting for?
5. Configure Alert Conditions
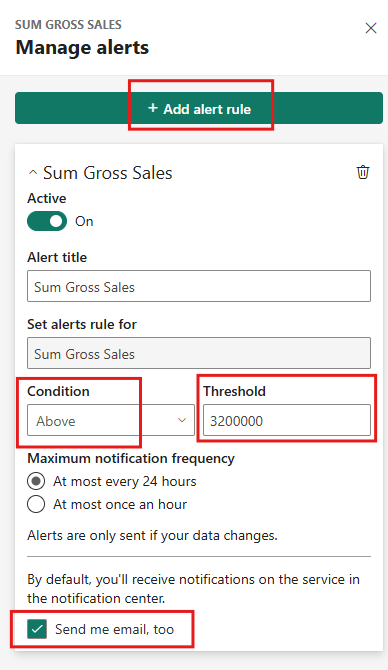
Set the conditions that will trigger the Power BI alert. For example, you can define thresholds such as “greater than 100” or “less than 50.” These rules determine when you’ll receive Power BI notifications. In my case, I want to see an alert in Power BI when sales exceed 3.2 million euros. At this stage, you can only set “above” or “below” values, and once triggered, data alerts in Power BI are sent via email.
However, this method is not the most flexible. It cannot filter alerts by customer or segment. For instance, if you want to be notified when a specific customer reaches a threshold in a Matrix visual, that won’t work here. These alerts are limited to high-level KPIs and broader measures, not granular conditions.
6. Save the Alert
Save the alert configuration. Once saved, Power BI will monitor the data and send notifications when the specified conditions are met.
Advantages of Dashboard Alerts
- Ease of Use: Setting up Power BI alerts through dashboards is simple and doesn’t require advanced technical skills. The interface for configuring alerts in Power BI is intuitive, making it accessible even for beginners.
- Broad Accessibility: Dashboard alerts work in the free version of Power BI, whether in a personal or Premium workspace, making them widely usable.
- Timely Notifications: You can receive Power BI notifications in real time, either directly in the service or via email. This ensures you can act quickly when critical data changes occur.
Limitations
- Dashboard Dependency: Data alerts in Power BI can only be created on visuals pinned to dashboards. This means you first need to build the visual in your report and then pin it to a dashboard before enabling alerts.
- Static Thresholds Only: Alerts are based on simple conditions like “greater than” or “less than.” Dynamic, data-driven triggers are not possible in this setup.
- Limited Visual Support: Only specific visuals—gauges, KPI cards, and cards—are supported. Tables, charts, or more advanced visuals cannot be used for Power BI alerts and notifications.
Dashboard alerts are a solid starting point for setting up Power BI data alerts, especially if you’re tracking straightforward KPIs with static thresholds. While they have clear limitations, they remain a reliable option for staying informed about important changes in your data.
Option 2: Combine Dashboard Alerts with Power Automate
Overview
For users seeking advanced customization, combining Power BI alerts and notifications with Power Automate opens a world of possibilities. This method allows you to enhance basic alerting capabilities by automating workflows and integrating with external systems like email, Microsoft Teams, or SharePoint. With Power Automate, you can go beyond static notifications and design end-to-end processes triggered by specific data changes in Power BI.
Power Automate workflows, also known as flows, allow you to automate repetitive tasks or trigger complex actions when certain conditions are met. These flows use the Power BI connector, enabling seamless integration between Power BI datasets and your business tools.
How to Set It Up
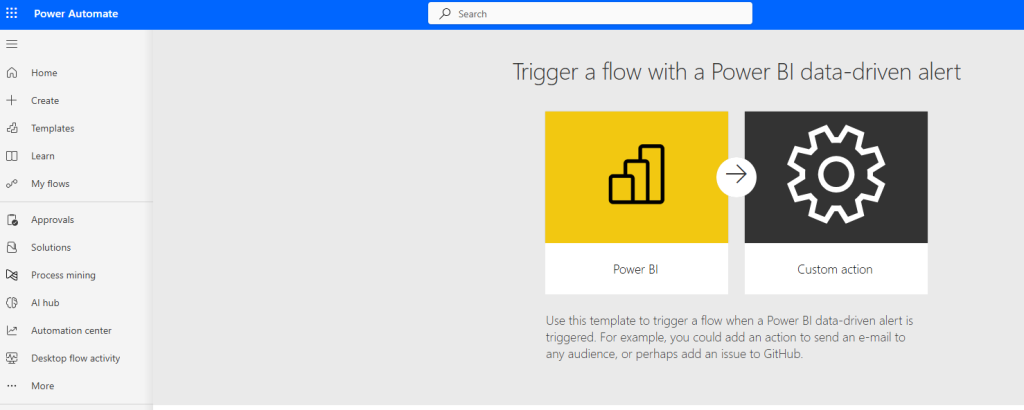
1. Create a Power Automate Flow
- Sign in to Power Automate and create a new flow.
- Go to the search bar and type:
- Use the template: Trigger a flow with a Power BI data-driven alert
2. Configure the Flow
- Define actions to take when the alert condition is met. For example:
- Send an email notification.
- Post a message to Microsoft Teams.
- Update a SharePoint list.
- Add conditions to tailor workflows, such as triggering only if the KPI exceeds a specific value.
📈 Master Power BI & Data Analytics
Join 10M+ learners on DataCamp. Learn at your own pace, from beginner to pro.
Your career growth starts here.
Examples of Power Automate Workflows
- Email Notifications:
- Automatically send an email to stakeholders when sales figures cross a threshold.
- Include dynamic data (e.g., total sales or region) in the email body for better context.
- SharePoint List Updates:
- Update a SharePoint list when data changes occur in Power BI.
- For example, log all KPIs exceeding a target to maintain a historical record.
- Teams Messages for Awareness:
- Post a real-time alert in a Teams channel when production delays exceed acceptable limits.
- Include actionable insights and links to Power BI reports for quick decision-making.
Advantages
- Flexibility in Workflow Design:
- With Power Automate, you can customize workflows to fit your specific requirements, whether it’s sending detailed notifications or updating external systems.
- Broader Integration with External Systems:
- Works seamlessly with tools like Outlook, SharePoint, Microsoft Teams, and even third-party applications like Slack or Zapier.
- Extended Functionality Beyond Dashboards:
- Allows automation of complex processes beyond the basic functionality of Power BI alerts and notifications.
Limitations
Setup Complexity:
- Requires familiarity with Power Automate and its interface.
- Beginners may find it challenging to design complex workflows without guidance.
- Threshold-Based Dependence:
- Still relies on static thresholds set within Power BI for triggering alerts.
Additional Resources
Learn more about setting up Power Automate flows for Power BI alerts from the official documentation:
Power Automate Documentation.
This integration of alerts in Power BI with Power Automate allows you to automate business processes and ensures that your team stays informed across platforms. Let me know if you’d like any more details or additional examples!
Option 3: Use Data Activator for Dynamic Alerts
Overview
Data Activator, part of Microsoft Fabric, is a cutting-edge solution for advanced alerting in Power BI. Unlike traditional methods like dashboard alerts or Power Automate flows, Data Activator provides dynamic, real-time monitoring and actionable notifications directly from reports. It eliminates the need for pinning visuals to dashboards and introduces more flexibility in how and when alerts are triggered.
With Data Activator, you can:
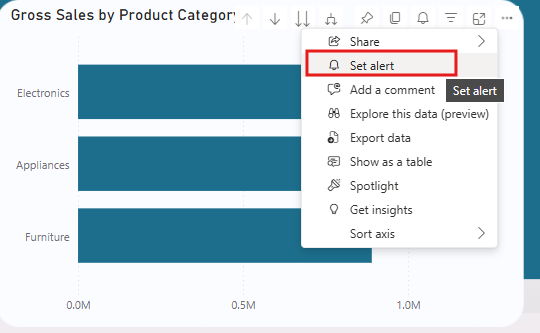
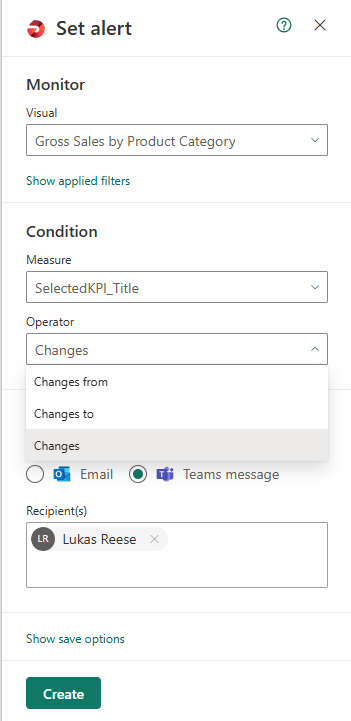
- Set Alerts Directly on Reports: Monitor your KPIs and metrics within reports without needing to pin visuals to a dashboard.
- Trigger Notifications Based on Value Changes: Configure alerts to trigger when a value increases, decreases, or changes, rather than relying on static thresholds like “greater than” or “less than.”
- Automate Business Actions: Integrate alerts with downstream workflows to automatically send notifications, update records, or perform other tasks when triggers occur.
Key Features of Data Activator
- Real-Time Intelligence: Monitor changes in your data as they happen and receive instant notifications.
- Flexible Triggers: Configure custom conditions, such as changes to KPIs, anomalies, or trends, that initiate an alert.
- Integration with Fabric Ecosystem: Leverage the broader capabilities of Microsoft Fabric for seamless data management and action.
- Direct Report Integration: No need to pin visuals to dashboards; alerts work directly from report visuals.
Requirements for Using Data Activator
- Fabric Capacity:
- Requires a Microsoft Fabric license, available through a free trial or a paid plan.
- Users without Fabric capacity cannot access Data Activator.
- Supported Visuals:
- Data Activator supports a wide range of Power BI visuals, including:
- Stacked column
- Clustered column
- Stacked bar
- Stacked 100% column
- Stacked 100% bar
- Clustered bar
- Ribbon chart
- Line
- Area
- Stacked area
- Line and stacked column
- Line and clustered column
- Pie
- Donut
- Gauge
- Card
- KPI
- Additionally, Data Activator supports table and matrix visuals, applying alert conditions to each row in a table or each cell in a matrix. If these visuals include a time-based column, Data Activator interprets it as a time axis.
- For map visuals, only those using the Location field are supported; visuals using Latitude and Longitude fields are not supported.
- Source
- Data Activator supports a wide range of Power BI visuals, including:
- Workspace Configuration:
- Must be used within a Microsoft Fabric-enabled workspace.
- Must be used within a Microsoft Fabric-enabled workspace.
Benefits of Data Activator
- Dynamic Alerts:
- Unlike Power BI Pro alerts, which rely on static thresholds, Data Activator supports value-change alerts for greater monitoring flexibility.
- More visual types are supported and alerts per category are possible (e.g. in Matrix table)
- No Dashboard Dependency:
- Alerts can be set directly on report visuals, eliminating the need to pin visuals to dashboards.
- Automation-Ready:
- Easily integrates with automated workflows, enabling proactive business responses.
Limitations of Data Activator
- Licensing Requirement:
- Requires Fabric capacity, which may not be accessible to all users.
- Complexity for Beginners:
- May require additional training or familiarity with Microsoft Fabric.
For more detailed information, please refer to the official Microsoft documentation: Create an alert in Power BI and fine-tune in Fabric Activator
Examples of Data Activator Use Cases
- Dynamic KPI Monitoring: Set an alert when the total sales increase or decrease compared to the previous reporting period.
- Anomaly Detection: Receive notifications for unexpected spikes or drops in customer engagement metrics.
- Real-Time Team Updates: Automatically notify relevant teams when operational metrics like inventory levels cross predefined ranges.
For more details, visit Microsoft’s Data Activator Documentation.
Practical Use Cases for Power BI Alerts
Dashboard Alerts:
- Track sales performance by receiving alerts when revenue exceeds a target.
- Monitor operational KPIs, such as inventory levels or production delays.
Power Automate:
- Notify team members via email or Teams in case of an anomalies
- Automate actions, such as logging data changes in a database.
Data Activator:
- Monitor dynamic KPIs with alerts for any value change.
- Respond quickly to critical changes without relying on thresholds.
Summary of Key Features
| Feature | Description |
|---|---|
| Dashboard Alerts | Notifications based on thresholds for pinned visuals in dashboards. |
| Power Automate Flows | Custom workflows triggered by data changes in Power BI. |
| Data Activator Alerts | Advanced alerts for value changes directly in reports (requires Fabric license). |
Frequently Asked Questions
FAQ
Do I need Power BI Pro to set up alerts?
No, you can set alerts in your personal workspace (My Workspace) or on Premium capacity dashboards with the free version. However, a Pro license is required for alerts in shared workspaces.
Can I set alerts directly in Power BI reports?
Yes, with Data Activator, you can create alerts directly on report visuals without pinning them to dashboards. This feature requires a Microsoft Fabric license.
What are the supported visuals for alerts in Power BI?
Power BI alerts are supported on gauges, KPIs, and cards. These must either be pinned to a dashboard (for traditional alerts) or set up directly in reports using Data Activator.
How do I get notified if a KPI changes?
Data Activator allows you to set value-change alerts. For example, you can trigger notifications when a KPI increases or decreases, instead of relying on static thresholds.
What are the limitations of Power BI Pro alerts?
Power BI Pro alerts are limited to threshold-based conditions like “greater than” or “less than.” They also require the visual to be pinned to a dashboard, which may not suit all use cases.
What is Data Activator, and why should I use it?
Data Activator is a Microsoft Fabric feature that provides advanced alerting capabilities, such as value-change alerts and direct notifications from reports. It is ideal for dynamic monitoring but requires Fabric capacity (trial or license).
What are the limitations of Data Activator?
Data Activator requires a Fabric license, which might not be available to all users. It also supports only certain visuals like gauges, KPIs, and cards.
Can I use Power Automate to enhance Power BI alerts?
Yes, you can integrate Power BI with Power Automate to create custom workflows. For example, you can send notifications via email or Teams or automate actions like logging data changes in a database.
How do I choose the best method for Power BI alerts?
It depends on your requirements:
- Dashboard Alerts: Use for simple, threshold-based notifications.
- Power Automate: Use for more flexible, customized workflows.
- Data Activator: Use for advanced, dynamic alerts based on value changes.
Conclusion
Power BI offers several ways to stay informed through alerts and notifications — from simple dashboard alerts to advanced Power BI Activator alerts with Data Activator. Whether you’re just starting out or already an advanced user, these tools make it easier to monitor key metrics and react quickly.
By combining Power BI alerts and notifications with features like email triggers or workspace integration, you can ensure timely updates without constantly checking reports. For more advanced scenarios, the new Data Activator in Microsoft Fabric enables truly dynamic Power BI data alerts, giving you more control and flexibility.
Now you know how to set up data alerts in Power BI and use them to unlock real-time insights that support faster, smarter decision-making. 🙂